

Windows 11 was designed with gamers in mind. It brings a lot of features and improvements that can significantly enhance your gaming experience. As a gamer, you’ll find that Windows 11 offers a perfect blend of performance, compatibility, and cutting-edge features that can take your gaming to the next level.
Why Windows 11 is Ideal for Gamers
- DirectStorage: This revolutionary technology improves the loading time of games. It will work automatically if your PC and the game you are playing are compatible.
- Auto HDR: Windows 11 can automatically add High Dynamic Range (HDR) enhancements to games built on DirectX 11 or higher, giving you more vibrant and lifelike visuals.
- DirectX 12 Ultimate: The latest version of Microsoft’s graphics API offers advanced features like ray tracing and variable rate shading, pushing the boundaries of gaming graphics.
- Xbox Game Bar: An enhanced overlay that allows you to capture screenshots, record gameplay, and even chat with Xbox friends without leaving your game.
- Xbox Game Pass Integration: Seamless access to a vast library of games through Xbox Game Pass, right from your desktop.
- Improved Performance: Windows 11 is optimized for speed and efficiency, which translates to better gaming performance, especially on newer hardware.
- Android App Support: While not directly related to gaming, this feature opens up possibilities for mobile gaming on your PC.
With these benefits in mind, let’s dive into how you can set up Windows 11 for the ultimate gaming experience.
Key Benefits of Using Windows 11 for Gaming
- Enhanced visual quality with Auto HDR and DirectX 12 Ultimate
- Faster load times and more detailed environments thanks to DirectStorage
- Improved overall system performance and efficiency
- Better integration with Xbox services and Game Pass
- Regular updates and support from Microsoft to improve gaming experience
System Requirements
Before you embark on your Windows 11 gaming journey, it’s crucial to ensure that your system meets the necessary requirements. Microsoft has set some specific hardware requirements for Windows 11, which are more stringent than those for Windows 10.
Minimum System Requirements
To run Windows 11, your PC must meet the following minimum specifications:
- Processor: 1 gigahertz (GHz) or faster with 2 or more cores on a compatible 64-bit processor or System on a Chip (SoC)
- Memory: 4 GB RAM or greater
- Storage: 64 GB or larger storage device (such as a hard drive or SSD)
- System firmware: UEFI, Secure Boot capable
- TPM: Trusted Platform Module (TPM) version 2.0
- Graphics card: DirectX 12 compatible graphics / WDDM 2.x
- Display: High definition (720p) display that is greater than 9″ diagonally, 8 bits per color channel
Recommended System Requirements
While the minimum requirements will allow you to run Windows 11, for an optimal gaming experience, we recommend the following:
- Processor: Intel 8th generation or newer / AMD Ryzen 3000 series or newer
- Memory: 16 GB RAM or greater
- Storage: 256 GB or larger NVMe SSD
- Graphics card: NVIDIA GeForce GTX 1060 or better / AMD Radeon RX 570 or better
- Display: Full HD (1080p) or higher resolution display
- Internet connectivity: Internet connection and Microsoft account to perform some setup steps, download and use some features
Remember, these are general recommendations. Specific games may have their own requirements, which could be higher or lower depending on the game’s complexity and graphics demands.
Preparing for Installation
Before you install Windows 11, it’s crucial to prepare your system properly. This preparation will ensure a smooth installation process and protect your important data.
Backing Up Your Data
Even if you’re planning a clean install of Windows 11, it’s always wise to back up your important files and data. Here’s how you can do it:
- External Hard Drive: The most straightforward method is to copy your important files to an external hard drive. Make sure to go through all your folders, especially Documents, Pictures, Videos, and any other locations where you store important files.
- Cloud Storage: Services like OneDrive, Google Drive, or Dropbox can be used to store your files in the cloud. This method provides an additional layer of security as your files are stored off-site.
- Windows Backup: Windows 10 has a built-in backup feature. You can access it by going to Settings > Update & Security > Backup. This will allow you to back up your files to an external drive or network location.
- System Image: For a complete backup of your entire system, you can create a system image. This will back up everything on your computer, including your operating system, programs, settings, and files.
Remember to backup your game saves as well. While many games now use cloud saves, it’s always better to be safe than sorry.
Creating a Bootable USB Drive
To install Windows 11, you’ll need to create a bootable USB drive. Here’s how to do it:
- Download the Windows 11 ISO: Visit the official Microsoft website and download the Windows 11 ISO file.
- Prepare a USB drive: You’ll need a USB drive with at least 8GB of storage. Note that all data on this drive will be erased, so back up any important files.
- Use the Media Creation Tool: Microsoft provides a Media Creation Tool that can create a bootable USB drive for you. Download this tool from the Microsoft website.
- Run the Media Creation Tool: Open the tool and follow the on-screen instructions. Select “Create installation media for another PC” when prompted.
- Choose your language and edition: Select the language and edition of Windows 11 you want to install.
- Select USB flash drive: Choose the option to create a bootable USB drive.
- Wait for the process to complete: The tool will download Windows 11 and create the bootable USB drive. This may take some time depending on your internet speed.
Once your bootable USB drive is ready, you’re all set to begin the installation process. But before we dive into that, let’s take a look at some pre-installation considerations that can help optimize your gaming experience on Windows 11.
Pre-Installation Considerations
Before you start the installation process, there are a few things you should consider to ensure the best possible gaming experience on your new Windows 11 system.
Updating Your BIOS
Updating your motherboard’s BIOS (Basic Input/Output System) can improve system stability, compatibility, and sometimes even performance. Here’s how to do it:
- Identify your motherboard model and current BIOS version.
- Visit the manufacturer’s website and download the latest BIOS version for your model.
- Follow the manufacturer’s instructions carefully to update the BIOS.
Remember, updating BIOS can be risky if not done correctly, so proceed with caution and follow instructions properly.
Enabling TPM 2.0 and Secure Boot
Windows 11 requires TPM 2.0 and Secure Boot to be enabled. These features enhance system security. Here’s how to enable them:
- Restart your computer and enter BIOS (usually by pressing F2, Delete, or another key during startup).
- Look for TPM settings. It might be called “TPM,” “Intel PTT,” or “AMD fTPM.”
- Enable TPM 2.0.
- Find the Secure Boot option and enable it.
- Save changes and exit BIOS.
Installation Process
Now that you’ve prepared your system and created a bootable USB drive, you’re ready to install Windows 11. Here’s a step-by-step guide to help you through the process:
- Boot from USB: Insert your bootable USB drive and restart your computer. You may need to press a key (often F12 or Esc) to enter the boot menu and select the USB drive.
- Start the installation: Once you’ve booted from the USB, you’ll see the Windows Setup screen. Select your language and other preferences, then click “Install Now.”
- Enter your product key: If you have a product key, enter it now. If not, you can select “I don’t have a product key” to continue the installation and activate Windows later.
- Choose the installation type: For a fresh install, choose “Custom: Install Windows only (advanced).”
- Select the installation drive: Choose the drive where you want to install Windows 11. If you’re doing a clean install, you may want to delete existing partitions first.
- Wait for the installation to complete: Windows will now install. This process may take some time and your computer will restart several times.
- Initial setup: Once the installation is complete, you’ll be guided through the initial setup process. Here, you’ll set up your Microsoft account, privacy settings, and other preferences.
- Welcome to Windows 11: Once the setup is complete, you’ll be greeted by your new Windows 11 desktop!
Post-Installation Optimization
Congratulations on successfully installing Windows 11! Now, let’s optimize it for gaming:
Updating Windows
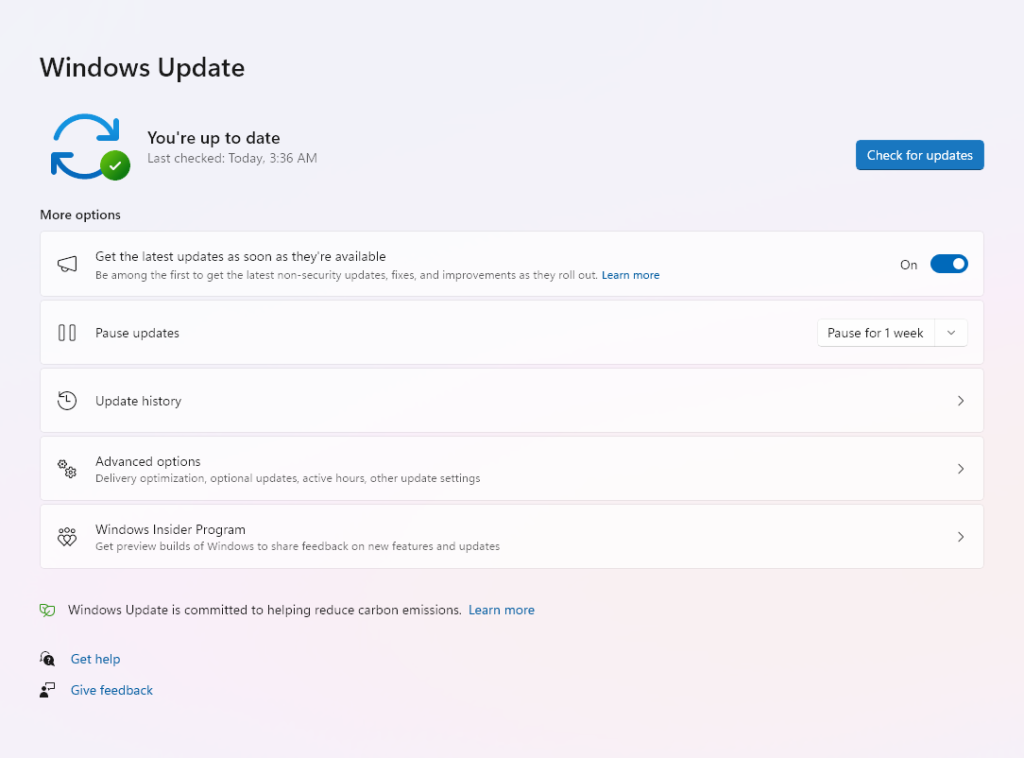
The first thing you should do is check for and install any available Windows updates:
- Go to Settings > Windows Update
- Click “Check for updates”
- Install any available updates
Installing Drivers
Now it’s time to install those drivers you downloaded earlier:
- Install your chipset drivers first
- Then install your graphics drivers
- Follow with network, sound, and any other drivers
Always download drivers from the manufacturer’s official website for the best performance and security.
Optimizing Power Settings
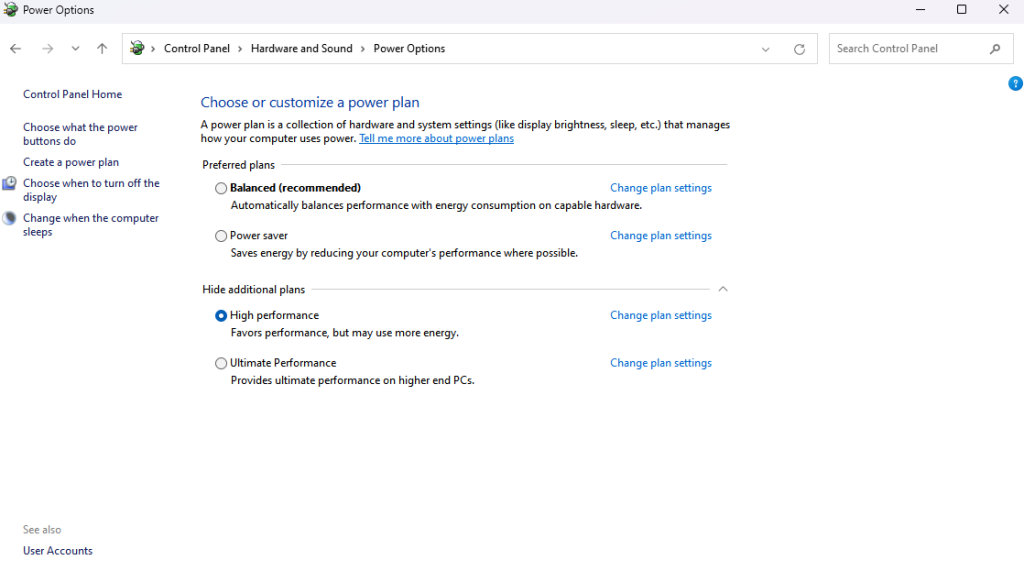
To ensure your system is running at full capacity:
- Go to Control Panel > Power Options
- Select “High performance” power plan
Optimizing Game Mode
Windows 11 comes with a Game Mode designed to improve gaming performance:
- Go to Settings > Gaming > Game Mode
- Ensure Game Mode is turned on

Conclusion
Setting up Windows 11 for gaming might seem like a complex process, but by following this guide, you can easily install it. Windows 11 brings many improvements and features that can enhance your gaming, from DirectStorage for faster load times to Auto HDR for more vibrant visuals.
Remember, the world of PC gaming is always evolving. Stay up to date with the latest drivers, Windows updates, and game patches to ensure you’re always getting the best performance.
Leave a Reply